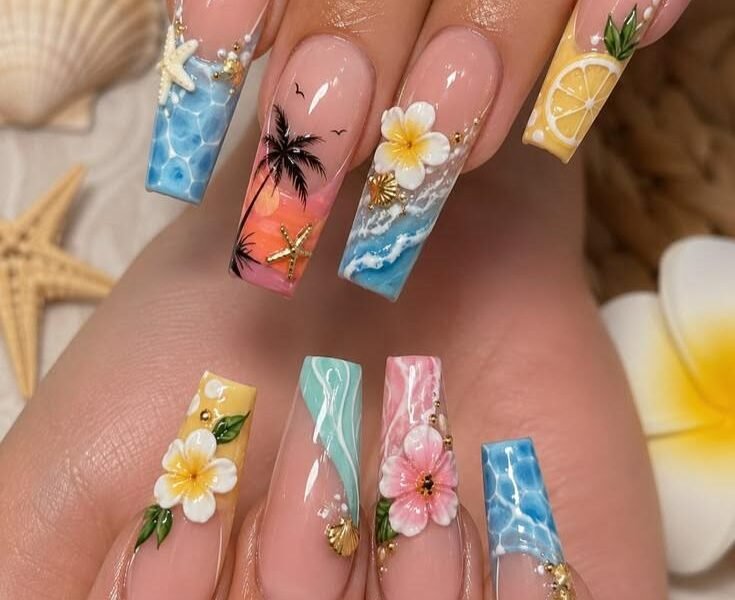
If you have been scrolling Pinterest or TikTok and stopped dead at a set of tropical beach nails with sunset palm trees, ocean waves, tiny gold starfish, and 3D flowers, you are not alone. This design has been one of the most searched summer nail trends this year, and the good news is that you do not need to be a professional nail tech to recreate a version of it at home.
This guide breaks the whole look down into small, manageable steps. We will cover the exact supplies you need, how to prep your natural nails, how to build the ombre sunset, how to paint the ocean waves, how to make (or fake) the 3D flowers, and how to place the little shell and starfish charms so they actually stick and do not fall off two days later.
This is a long guide because we want to be thorough, but do not let that scare you. Read it once all the way through before you touch a brush, then follow it step by step while you work. That is the difference between a set that looks like the photo and a set that looks like a toddler got into your nail polish.
What This Nail Set Actually Is
Before we jump into steps, let us talk about what you are looking at, because understanding the design helps you plan your own set.
This is a full set of coffin shaped (also called ballerina shaped) acrylic or gel extension nails, done in a mixed set style. That means not every nail matches. Instead, each nail tells a small piece of a beach story:
- A blue ombre wave nail with a gold starfish charm
- A sunset palm tree silhouette nail with birds and a starfish
- A soft nude nail with a hand painted white plumeria flower and a shell
- A yellow lemon slice nail
- A pineapple nail with green leaves
- A teal and white marble wave nail
- A pink marble nail with a painted flower cluster
- A blue water ripple nail
Mixed sets like this look complicated, but here is the secret nobody tells beginners: you are not painting eight completely different skills. You are really only learning about five techniques, then repeating and rearranging them across different nails. Once you learn ombre blending, one wave technique, one flower technique, and how to place charms, you can mix and match to build almost any tropical set you want.
Supplies You Will Need
Do not skip buying the right tools. This is the single biggest reason beginner nail art fails. Cheap thin brushes and no dotting tool will make this project ten times harder than it needs to be.
Base products
- Nail prep (alcohol wipes or a nail dehydrator)
- Cuticle pusher and cuticle nippers
- Nail file and buffer block
- Clear or sheer pink builder gel, or acrylic powder and liquid if you are doing extensions
- Nail forms or tips if you want the coffin shape and length shown in the photo (press on extensions work fine if you are not confident freehand sculpting yet)
- Base coat
- No wipe top coat (gel) or regular clear top coat (if using polish)
- LED or UV lamp if you are working with gel
Colors
- White gel polish or acrylic paint
- Sheer nude or your favorite nude/pink gel polish for the base
- Sky blue and navy or teal gel polish for the ocean nails
- Coral, orange, pink, and black gel polish or acrylic paint for the sunset palm tree
- Yellow gel polish for the lemon and pineapple nails
- Green gel polish or paint for the pineapple leaves
- Soft pink and white for the marble nails
- Gold chrome pigment or gold foil (optional, for the wave shimmer)
Tools for detail work
- A thin detail nail art brush (a size 000 or 00 liner brush)
- A small round dotting tool, or two, in different sizes
- A makeup sponge, cut into small triangles, for ombre blending
- Striping tape (optional, helps keep your French tip line clean)
- Tweezers for charm placement
Charms and extras
- Small gold starfish charms
- Small gold or silver shell charms
- Tiny gold caviar beads or pearls
- 3D acrylic flower molds, or premade 3D flower charms if you do not want to sculpt your own
- Nail glue or clear gel to secure charms
You can find almost all of this in a beginner nail art kit online, so you do not need to buy fifteen separate items from fifteen different places.
Step 1: Prep Your Natural Nails Properly
This step gets skipped by almost every beginner and it is the reason polish lifts within two days.
- Remove any old polish completely.
- Push back your cuticles gently with a cuticle pusher. Do not cut into the skin if you are not experienced with nippers, just push back and trim any loose hangnails.
- File your natural nail into a rough shape, then lightly buff the surface of the nail plate to remove shine. This gives your base coat something to grip onto.
- Wipe every nail down with an alcohol pad or nail dehydrator. Do this last, right before you apply anything, and do not touch the nail plate with bare fingers afterward. Oil from your skin is what causes lifting.
Step 2: Shape and Apply Your Extensions
If you are going for the long coffin shape in the photo, apply your nail forms or tips now and build your extension using acrylic or hard gel. File the shape into a coffin (a squared off tip with tapered sides) using a straight edge file, then buff the surface smooth.
If you are newer to nail art and extensions feel intimidating, you can absolutely do this entire design on press on nails or on your natural short nails. Shorten the design elements slightly and it will still look great. Do not let nail length stop you from trying this.
Apply a thin layer of base coat and cure it (or let it dry) before moving to color.
Step 3: Build the French Tip Base on Some Nails
Look at the photo again. Several nails start with a clear or sheer nude nail bed and then color only appears at the tip, like a French manicure. This is done first on the nails that need it (the pink flower nail, the yellow lemon nail, the wave nails).
- Paint the whole nail with one or two thin coats of sheer nude or clear pink gel. Cure between coats.
- Using a thin brush or striping tape, paint just the tip in your chosen color, following a smile line shape (a slight curve, not straight across).
- Cure or let dry.
This step gives you that soft, elegant transition from skin toned nail bed into the colorful design, which is what makes the whole set look polished instead of painted edge to edge.
Step 4: The Sunset Ombre Palm Tree Nail
This is the nail that looks the hardest and is honestly the most fun once you get the hang of it.
- Start with your French tip base already dry.
- Take your makeup sponge and dab a small amount of coral or orange polish onto it, near the bottom of the tip area.
- Dab a small amount of pink or magenta right above the orange, slightly overlapping.
- Dab the sponge gently onto the nail in a light patting motion, moving upward. Do not swipe, pat. This blends the colors into a gradient instead of leaving hard lines.
- Let this dry or cure, then repeat a second light layer if the color looks patchy. Two thin sponged layers always look better than one thick one.
- Once your sunset base is cured, take your thin detail brush and black paint or gel. Paint a simple palm tree silhouette near the bottom of the nail. Keep it simple: one curved trunk line and five or six curved leaf strokes fanning out from the top. It does not need to be perfect, palm trees are forgiving shapes.
- Add two or three tiny V shapes above the tree line to represent birds flying in the distance.
- Seal with top coat, then glue on a small gold starfish charm near the base of the nail using a drop of clear gel or nail glue.
Step 5: The Ocean Wave Nails
You will use this technique on more than one nail in the set, just in different colors (blue, teal, or a soft blue and white combo).
- Sponge blend two shades of blue (a lighter sky blue near the tip fading to a deeper navy or teal near the cuticle, or the reverse, whichever direction you prefer). Same patting technique as the sunset.
- Once dry, use your thin detail brush with white polish or paint. Paint a curved, uneven horizontal line across the nail, this is your wave crest. Make it wavy, not straight, real waves are never a straight line.
- From that white line, pull small comma shaped strokes upward and outward, like the wave is breaking. This creates that foamy, splashing texture you see in the photo.
- Add a few tiny white dots scattered around the wave using your dotting tool, to look like sea foam and water droplets.
- Once dry, glue on a small gold shell charm or starfish charm right at the base of the wave.
- Finish with top coat.
Step 6: The Marble Nails
The teal and white nail and the pink and white nail in the photo use a simple marble effect.
- Paint your base color first (teal or soft pink) and let it dry completely.
- Take your thin detail brush, dip it in white polish, and drag thin, irregular wavy lines across the nail from one edge to the other. Vary the pressure so some lines are thicker and some thinner.
- While that white line is still wet, you can lightly drag a clean dry brush through parts of it to soften and blend the edges. Do not overdo this or you will lose the marble effect and just get a smudge.
- Let dry completely and seal with top coat.
Step 7: The Lemon and Pineapple Fruit Nails
These two nails add a playful pop to the set and they are easier than they look.
Lemon nail
- Paint the tip area yellow over your French tip base, same method as step 3.
- Once dry, use white paint and a thin brush to draw a circle shape in the center of the yellow area, this is the cut lemon slice.
- Inside the circle, draw thin lines radiating out from the center like a wheel, then fill the tiny sections between lines with a slightly lighter yellow or white to mimic lemon flesh.
- Add a few tiny white dots around the border of the circle for texture.
- Seal with top coat and add a small gold bead or two near the base for extra shine.
Pineapple nail
- Paint the tip yellow, same as above.
- Using your detail brush and a darker yellow or light brown, draw a criss cross diamond pattern across the yellow area, this creates the pineapple skin texture.
- Add a tiny dot in the center of each diamond.
- At the top of the nail (the cuticle area), paint two or three green leaf shapes pointing upward and outward, like the pineapple crown.
- Seal with top coat.
Step 8: The 3D Flower Nails
This is the step beginners worry about most, but there is a shortcut.
If you want to sculpt your own: dip a small brush into clear acrylic liquid, then into white acrylic powder, and roll it into a small ball. Place five small balls in a flower shape on your nail using a flat detail brush or a silicone tipped tool, flattening each ball slightly and pinching one edge to create a petal shape. Add a small yellow ball in the center. Let it cure fully before touching it.
If sculpting feels too advanced right now: buy premade 3D acrylic flower charms online. They come in white, pink, and mixed colors and you simply glue them onto the nail with clear gel or nail glue. This gives you the exact same finished look in the photo without needing to sculpt anything, and honestly, most nail techs use premade charms for detailed flowers like this too. There is no shame in the shortcut.
- Decide where your flower cluster will sit, usually toward the base or slightly off center.
- Glue your flowers down, slightly overlapping two or three of them for a fuller look.
- Add a couple of green leaf shapes painted or glued near the flowers.
- Add tiny gold beads scattered around the flowers for extra dimension.
- Seal everything except the very top of the 3D flowers themselves with top coat (too much top coat can dull the raised texture, a light seal around the edges is enough).
Step 9: Placing Your Shells, Starfish, and Gold Beads
This step ties the whole set together and it is oddly satisfying.
- Using tweezers, pick up each charm.
- Dip the back very lightly in clear nail gel or a small dot of nail glue.
- Place it exactly where you want it and hold for five to ten seconds so it sets.
- Do not overload every nail. Look at the photo again, the charms are placed sparingly, usually one or two per nail. That restraint is what makes it look expensive instead of cluttered.
Step 10: Seal Everything With Top Coat
Once every nail is fully dry or cured, apply a final layer of top coat over the entire set, being careful around raised 3D elements. This protects your design, adds shine, and helps prevent chipping. If you are using gel, cure this final layer fully under your lamp.
Beginner Mistakes to Avoid
- Skipping nail prep. Your design will lift within days if you do not dehydrate and buff the nail first.
- Using thick coats of polish for the ombre. Thin, patted layers always blend better than one thick swipe.
- Rushing the drying or curing time between steps. Every layer needs to be fully set before you add the next.
- Overcrowding charms. Two or three well placed charms look better than ten scattered ones.
- Using a thick brush for detail work. A proper thin liner brush makes palm trees, waves, and lemon slices look ten times more realistic.
How Long Will This Set Last
If you are using gel or acrylic extensions with proper prep, this set can realistically last three to four weeks before you need a fill or a redo. If you are doing this over your natural nails with regular polish, expect five to seven days before chipping starts, so consider a gel top coat to extend the wear.
Frequently Asked Questions
Do I need to be a professional to do this design? No. Every technique in this guide, ombre sponging, simple line work, marbling, and charm placement, is beginner friendly once you have the right tools. Give yourself two to three practice nails before your first full set.
Can I do this without acrylic extensions? Yes. This entire design translates well onto short natural nails or press ons. Just scale down the palm tree and wave details slightly to fit a smaller canvas.
What if I do not want to sculpt 3D flowers? Use premade 3D flower charms. They glue on in seconds and give you the same finished look.
How do I keep my ombre from looking streaky? Use a makeup sponge, not a brush, and pat rather than swipe. Do two thin layers instead of one thick layer.
What is the best way to seal charms so they do not fall off? Use a proper nail glue or clear builder gel, press firmly, and hold for at least ten seconds. Cover the edges of the charm lightly with top coat once it is secure.
Final Thoughts
This tropical beach nail set looks like it belongs on a magazine cover, but every element in it breaks down into simple, repeatable steps. Ombre blending, one wave technique, a palm tree silhouette, a couple of fruit designs, a marble effect, and some glued on charms. Learn each piece on its own, practice on a spare nail tip first if you are nervous, and then build your full set one nail at a time.
Save this guide, screenshot the steps, and give yourself permission to have a slightly imperfect first attempt. That is how every nail tech you admire online got started too.
If you try this design, I would love to see how yours turns out. Tag your version and let me know which nail was your favorite to create.